Improving The Accuracy of Temperature Measurements
Introduction
Highly accurate temperature measuring equipment is now widely available at very reasonable costs but, whilst this should be making the task of making temperature measurement easy, many users make simple mistakes that negate the benefits of using high specification sensors and measuring equipment.
When most people have a requirement to measure a temperature, their first reaction is to purchase the highest specification, most expensive sensor and measuring instrument they can afford. Speaking as a manufacturer, this is a reaction we applaud as it sells a lot of equipment. It is however the wrong way to set about making accurate measurements.
Making the Right Measurement

Figure 1
Consider what you are trying to measure the temperature of. An example that seems simple at first is measuring room temperature to 1°C accuracy. The problem here is that room temperature is not one temperature but many.
Figure 1 shows sensors at three different heights record the temperatures in one of Pico Technology's storerooms. The sensor readings differ by at least 1°C so clearly, no matter how accurate the individual sensors, we will never be able to measure room temperature to 1°C accuracy.
Another seemingly obvious but frequently overlooked point is that you are only ever recording the temperature of the sensor. Any difference between the temperature of the sensor and the temperature you are trying to measure will be a direct error. For example, if you clamp a temperature sensor around a pipe (figure 2) it would be wrong to assume you are measuring the temperature of what is flowing in the pipe.

Figure 2
In Figure 2 a temperature difference exists between inner and outer surfaces of the pipe, and ambient air temperature and airflow around the sensor will cause additional errors. However, for practical and/or safety reasons, you may have no choice but to make your measurement in this way — in which case errors can be reduced by thermally lagging both the sensor and the section of pipe to which the sensor is attached.
In addition, give thought to how the presence of your sensor may actually affect the measurement. Figure 3 demonstrates this point.
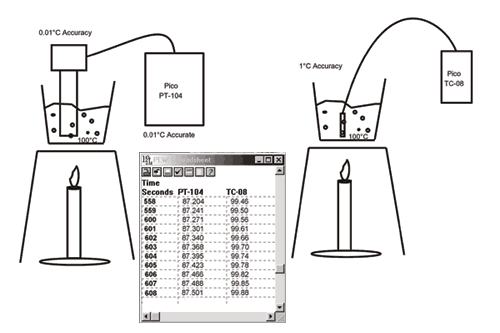
Figure 3
Figure 3: In this experiment, high and low accuracy sensor and instrument pairs were used to observe the rising temperatures of equal volumes of water being heated. A large, expensive and accurate Pt100 sensor was connected to a PT-104 (both with 0.01 °C accuracy) and partially immersed in one beaker, whilst a low–cost thermocouple, connected to a TC-08 (0.5 °C accuracy), was immersed in the second beaker. Using the Pt100 sensor in this manner invalidated the accuracy of both the sensor and the instrument because of ‘thermal shunting’. The dissipation of heat from the larger, partially immersed probe into the atmosphere reduced the rate at which the water could be heated. Furthermore, in this experiment, the temperature of the PT100 never reached 100 °C even though the water did boil. The low–cost, lower accuracy solution afforded the more accurate and representative measurement.
Having considered what you are going to measure, the next step is to decide which type of sensor to use. The three sensors most commonly used in research and industry are: the thermocouple; the resistance temperature detector (RTD or ‘resistance thermometer’); and the thermistor. Table 1 compares and contrasts the three.
Table 1 — the most commonly used temperature sensors and their properties
|
Thermocouple |
RTD
(Pt100) |
Thermistor |
| Operating Range |
-200 °C to 2000 °C |
-250 to 850 °C |
-100 to 300 °C |
| Accuracy |
Low
1 °C common |
Very High
0.03 °C common |
High
0.1°C common |
| Linearity* |
Medium |
High |
Low |
| Thermal Response** |
Fast |
Slow |
Medium |
| Cost |
Low |
High |
Low to moderate |
| Noise Problems |
High |
Medium |
Low |
| Long term stability |
Low |
High |
Medium |
| Cost of measuring instrument |
Medium |
High |
Low |
* Linearity is not an issue if using modern digital measuring instruments, as look–up tables stored in memory provide compensation.
** Thermal response is considered for the measuring element only, not its enclosure.
Thermocouples
In 1822, an Estonian physician named Thomas Seebeck discovered (accidentally) that the junction between two metals generates a voltage that is a function of temperature, and all thermocouples rely on the so-called ‘Seebeck effect’. Thermocouples are not, however, precision sensors: errors of 2 °C are typical. However, thermocouples have a wide temperature range (-200 to 2000 °C) and are often needed simply because alternative devices do not operate at the desired temperature. In addition, they are relatively low–cost and versatile.
Although almost any two types of metal can be used to make a thermocouple, a number of standard types are used (see table 2) because they possess predictable output voltages and large temperature gradients.
Standard tables show the voltage produced by thermocouples at any given temperature. For example, a K type thermocouple (the most popular) at 300 °C will produce 12.2 mV. This generation of a voltage, albeit small, does mean thermocouples (unlike RTDs and thermistors) are self-powered and require no excitation current. Unfortunately it is not possible to simply connect a voltmeter to the thermocouple to measure this voltage as doing so creates a second, undesired thermocouple junction. To make accurate measurements a technique known as cold junction compensation (CJC) is employed. All standard thermocouple tables allow for this second thermocouple junction by assuming that it is kept at exactly 0 °C. Traditionally, this was done with a carefully constructed ice bath. Maintaining an ice bath however is not practical for most applications; instead the actual temperature at the point of connection of the thermocouple wires to the measuring instrument is recorded and compensated for. Typically, cold junction temperature is sensed by a precision thermistor in good thermal contact with the input connectors of the measuring instrument. This second temperature reading, along with the reading from the thermocouple itself, is used by the measuring instrument to calculate the true temperature at the thermocouple tip. Understanding of CJC is important, as any error in the measurement of the cold junction temperature will lead to the same error in the measured temperature from the thermocouple tip.
On a general note, avoid subjecting the thermocouple connections — and indeed the measurement instrument — to sudden changes in temperature, such as those produced by drafts, as this will lead to errors.
As mentioned, different choices of metals for the thermocouple's two conductors produce sensors with different characteristics. Table 2 summarises the most popular types.
Table 2 — Popular Thermocouple Types
| Thermocouple Type |
Overall Range |
Typical Accuracy* |
Comments |
Type B
(Platinum / Rhodium) |
100 to 1800 |
5 °C (at 1000°C) |
Suited for high temperature measurements. Unusually, type B thermocouples give the same output at 0 °C and 42 °C. This makes them useless below 50 °C. |
Type E
(Chromel / Constantan) |
-200 to 900 |
1.7 °C |
Type E has a high output (68 µV/°C) which makes it well suited to low temperature (cryogenic) use. Another property is that it is non-magnetic. |
Type J
(Iron / Constantan) |
-40 to 760 |
2.2 °C |
Limited range makes type J less popular than type K. J types should not be used above 760°C as an abrupt magnetic transformation will cause permanent decalibration. |
Type K
(Chromel / Alumel) |
-200 to 1300 |
2.2 °C |
Type K is the ‘general purpose’ thermocouple. It is low cost and popular. Sensitivity is approx 41 µV/°C. Use type K unless you have a good reason not to. |
Type N
(Nicrosil / Nisil) |
-200 to 1300 |
2.2 °C |
High stability and resistance to high temperature oxidation makes type N suitable for high temperature measurements without the cost of platinum (B,R,S) types. Designed to be an 'improved' type K, it is becoming increasingly popular. |
Type R
(Platinum / Rhodium) |
-50 to 1760 |
1.5 °C |
Suited for high temperature measurements up to 1600 °C. Low sensitivity (10 µV/°C) and high cost makes them unsuitable for general purpose use. |
Type S
(Platinum / Rhodium) |
-50 to 1760 |
1.5 °C |
Suited for high temperature measurements up to 1600 °C. Low sensitivity (10 µV/°C) and high cost makes them unsuitable for general purpose use. Due to its high stability type S is used as the standard of calibration for the melting point of gold (1064.43 °C). |
Type T
(Copper / Constantan) |
-200 to 400 |
1 °C |
Best accuracy of common thermocouples, often used for food monitoring and environmental applications. |
* At 0 °C unless indicated. Many manufacturers offer ‘special’ thermocouples with improved accuracy down to 0.5 °C
Thermocouples are made of thin wire to minimise thermal shunting and increase response times. This thin wire causes the thermocouple to have a high resistance that can cause errors due to the input impedance of the measuring instrument. A typical exposed junction thermocouple with 32 AWG wire (0.25 mm diameter) will have a resistance of about 15 Ω/m. If thermocouples with thin leads or long cables are needed, it is worth keeping the thermocouple leads short and then using thermocouple extension wire (which is much thicker and has a lower resistance) to run between the thermocouple and measuring instrument. It is always good practice, before you make precision measurements using thermocouples, to check the input impedance of the measuring instrument and also the resistance of each thermocouple.
If you need to increase the length of the leads from a thermocouple, use only the correct type of thermocouple extension wire. Using any other type of wire will introduce an undesirable thermocouple junction. Ensure any plugs, sockets or terminal blocks used to connect the extension wire are made from the same metals as the thermocouples and correct polarity must be observed at all times.
With signal levels from thermocouples measuring only microvolts, noise pickup can be a problem. Noise from stray electrical and magnetic fields is typically orders of magnitude higher than the signal level. Most measuring instruments reject any common mode noise (signals which are the same on both wires) — but this rejection is not perfect, so it makes sense to minimise the noise where possible. This can be done by routing wires away from noisy areas and twisting the two (insulated) leads of the thermocouple cable together to help ensure both wires pick up the same noise. If operating in an extremely noisy environment (such as near a large motor) it is worth considering using a screened extension cable.
A final note on thermocouples: decalibration. This is the process of unintentionally altering the makeup of the thermocouple. The usual cause is the diffusion of atmospheric particles into the metal at the extremes of the operating temperature range. Another cause is impurities and chemicals from the insulation diffusing into the thermocouple wire. If operating at high temperatures, check the specifications of the probe insulation. In addition, it is always good practice to use thermocouples with insulated junctions as this helps protect against oxidation and contamination.
RTDs
Another common type of temperature measuring device is the resistance temperature detector — the most stable and accurate (although expensive and fragile) of the three sensor types discussed in this article. The electrical resistance of any metal varies according to its temperature — in most cases resistance increases with temperature and is said to have a positive temperature coefficient (PTC).
Perhaps the most common type of RTD is the platinum resistance thermometer (PRT), the practical operating range of which is -250 to 850 °C. Depending on type, RTDs have an accuracy of between 0.03 and 0.3 °C. The most frequently used PRT is the Pt100 — so called because it has a resistance of 100 Ω at 0 °C.
PRTs are either wire–wound or metal film resistors. Of these, the latter exhibits the faster response time. As a Pt100 sensor is basically a resistor, its value can be measured with an Ohmmeter as per figure 4. However, the low resistance of the sensor and its low sensitivity (0.385 Ω/°C) make accurate measurements difficult due to lead resistance. A 1 Ω resistance in each lead connecting the Pt100 to the meter will cause an error of more than 5 °C.
To avoid the problem of lead resistance errors, most Pt100 measurements are made using a 4–wire configuration (figure 4). Here, two of the wires are used to provide an excitation current and the other two connect a voltmeter over the PRT. Provided the impedance of the voltmeter is high then a few Ohms of resistance in the cables will not cause an error.
A compromise between the 2 and 4–wire configurations shown is the so–called 3–wire measurement. Discount this for high accuracy measurements as it assumes, often falsely, that all three wires have the same resistance. In practice, accurate measurement requires the 4-wire configuration. Furthermore, a thermistor will often give a better accuracy than a 3 or 4-wire Pt100 measurement.

Figure 4
Figure 4: The 4–wire configuration (right) affords the best accuracy, but beware: low resistance and low sensitivity of the RTD place considerable demands on the measuring instrument and a compromise has to be made between excitation current, noise and resolution.
Excitation current should be as low as possible (<1 mA) in order to minimise self–heating of the sensor. This reduces the sensor’s output voltage, the signal to noise ratio (through increased noise pickup) and resolution of the instrument. Fortunately advanced instruments are to hand. The new PT-104 from Pico Technology, for example, uses a drive current of only 0.25 mA yet — thanks to a novel design and use of a 24 bit analogue to digital converter — still provides 0.001 °C resolution.
For high accuracy measurement, self-heating errors should always be taken into account — and values for drive current and self–heating for a given sensor should be available from the manufacturer. Physically small sensors have self-heating errors as high as 1 °C/mW in free air. A 1 mA drive current into 100 Ω dissipates 0.1 mW, so causes a 0.1 °C error. Using a physically large sensor will minimise self–heating errors, but can lead to thermal shunting errors (as demonstrated in the experiment in figure 2).
The small signals from a Pt100 sensor lead to noise pickup problems similar to those encountered for thermocouples and the same precautions against pickup should be used.
One final trap that often catches the unwary is the existence of two different compensation curves. The DIN 43760 standard, also called the ‘European Curve’, is 0.385 Ω/°C for a Pt100 sensor. However, there is also an ‘American Curve’ based on platinum wire of a higher purity (often used for reference standards), and this defines the temperature co–efficient as 0.392 Ω/°C. Of the two, the European curve is the more dominant (even in America) and most measurement instruments compensate for it. If however, the PRT has an American curve and the instrument is compensating for a European sensor, then a small error will result.
Thermistors
Many people unfairly regard thermistors as inaccurate sensors. This may have been true in the past, when thermistors had 5% tolerances at best. For extreme accuracy the RTD is still the best choice, but modern thermistors are not far behind. Thermistors with 0.1 °C accuracy are now widely available and at very reasonable costs. They have a fast response time and a greater output per °C than RTDs.
As with RTDs, thermistors also exploit the fact that a material’s resistance changes with temperature. However, the majority of thermistors employ a metallic oxide and have a negative temperature coefficient (NTC). Thermistors provide relatively high accuracy (0.1 to 1.5 °C) but only operate over a limited temperature range: -100 to 300 °C. Furthermore, no single thermistor will cover this range and a lack of standards means it is often necessary to buy the sensor and measuring equipment together. The thermistor’s response is non–linear and, as with RTDs, we must avoid providing too large an excitation current through the thermistor because of self-heating.
Connection to instruments is a simple 2–wire configuration, as — unlike RTDs — we do not need to compensate for lead resistances: this is small compared to the thermistor’s resistance (typically between 1 and 100KΩ).
Thermistors, because of their high sensitivity, are ideal for detecting small changes in temperature — especially when it is the change and not the absolute value that is important.
Having chosen our temperature sensor, and ensured we are using it in such a way so as to reap all of its benefits, all that remains is to get the most from our measurement equipment. Here, check the accuracy specifications of the instruments as these vary widely between types of instrument and manufacturers. In some cases, when using RTDs for example, the majority of system error may come from the instrument. When using thermocouples however, the measurement instrument usually has a small error when compared to the sensor. With thermistors, because they have look-up curves particular to the device, it is usual to purchase matched sensors and instruments together from the same manufacturer.
For accurate measurements, calibration is a must and where possible instrument and sensor(s) should be calibrated together as a system.
High precision temperature measurement is possible through the use of well–specified and suitably calibrated sensors and instrumentation. However, the accuracy of these measurements will be meaningless unless the equipment and sensors are used correctly.
